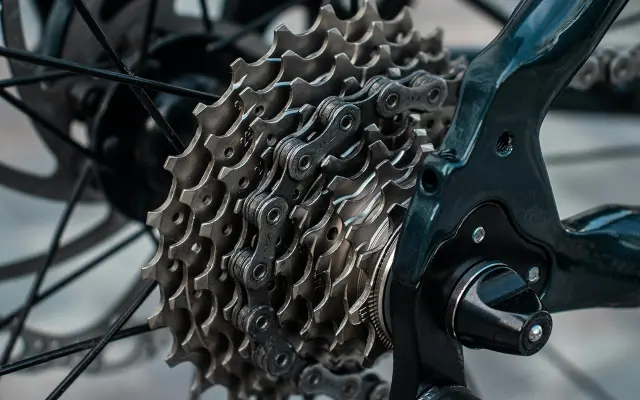
Your mountain bike chain is the workhorse of your drivetrain, silently transferring power to your wheels. But like any workhorse, it needs regular care to keep it running smoothly and efficiently.
This guide will show you exactly how to check your mountain bike chain for wear and tear, so you can replace it before it causes damage to other parts of your drivetrain.
For a clear understanding of chain wear and how Park Tool’s tools can help, watch their video on replacing your bike chain.
Step-by-Step Method to Check and Determine When to Replace Your MTB Chain
Step 1: Visual Inspection
Inspect for Dirt and Rust
Look for Visible Dirt and Grime:
Examine the chain for any accumulated dirt, grime, or gunk. This debris can hinder the smooth movement of the chain and cause premature wear on the drivetrain components.
Regular cleaning is crucial to ensure the chain runs smoothly and lasts longer.
Check for Rust:
Look for signs of rust or corrosion on the chain links. Rust weakens the chain and can lead to breakage during a ride.
Rust can significantly reduce the chain’s lifespan and efficiency. Address rust promptly to maintain optimal performance.
Check for Chain Slop
Test Side-to-Side Movement:
Lift the chain off the front chainring and wiggle it side-to-side. Check for excessive lateral movement.
Excessive side-to-side movement, known as chain slop, indicates wear and reduces the chain’s ability to hold tension properly, leading to poor shifting and increased noise.
Evaluate Chain Tension:
While pedaling backward, observe if the chain remains taut or if it sags significantly.
A properly tensioned chain should have minimal sag. Excessive sagging can cause derailments and inefficient power transfer.
Check for Stiff Links
Identify Stiff Links:
Slowly pedal backward and observe the chain as it passes through the derailleur pulleys. Look for links that don’t bend smoothly and cause a jerky motion.
Stiff links can cause poor shifting performance and may indicate that the chain is dirty or worn out.
Manually Flex the Links:
Flex each link back and forth manually. They should move freely without resistance.
Free movement of each link is crucial for smooth operation. Stiff links suggest the need for cleaning or replacement.
Look for Stretch
Pull the Chain Away from the Chainring:
Shift to the smallest chainring and smallest cog to reduce tension. Pull the chain away from the front chainring and observe the gap between the chain and the chainring teeth.
If you see a significant gap, it indicates that the chain is stretched. A stretched chain will not mesh properly with the gears, leading to poor performance and increased wear on the drivetrain.
Check for Elongation:
Measure the distance between several consecutive chain pins. Excessive elongation indicates that the chain has stretched beyond its serviceable limit.
Chains elongate with wear, which affects shifting performance and can damage other drivetrain components if not replaced in time.
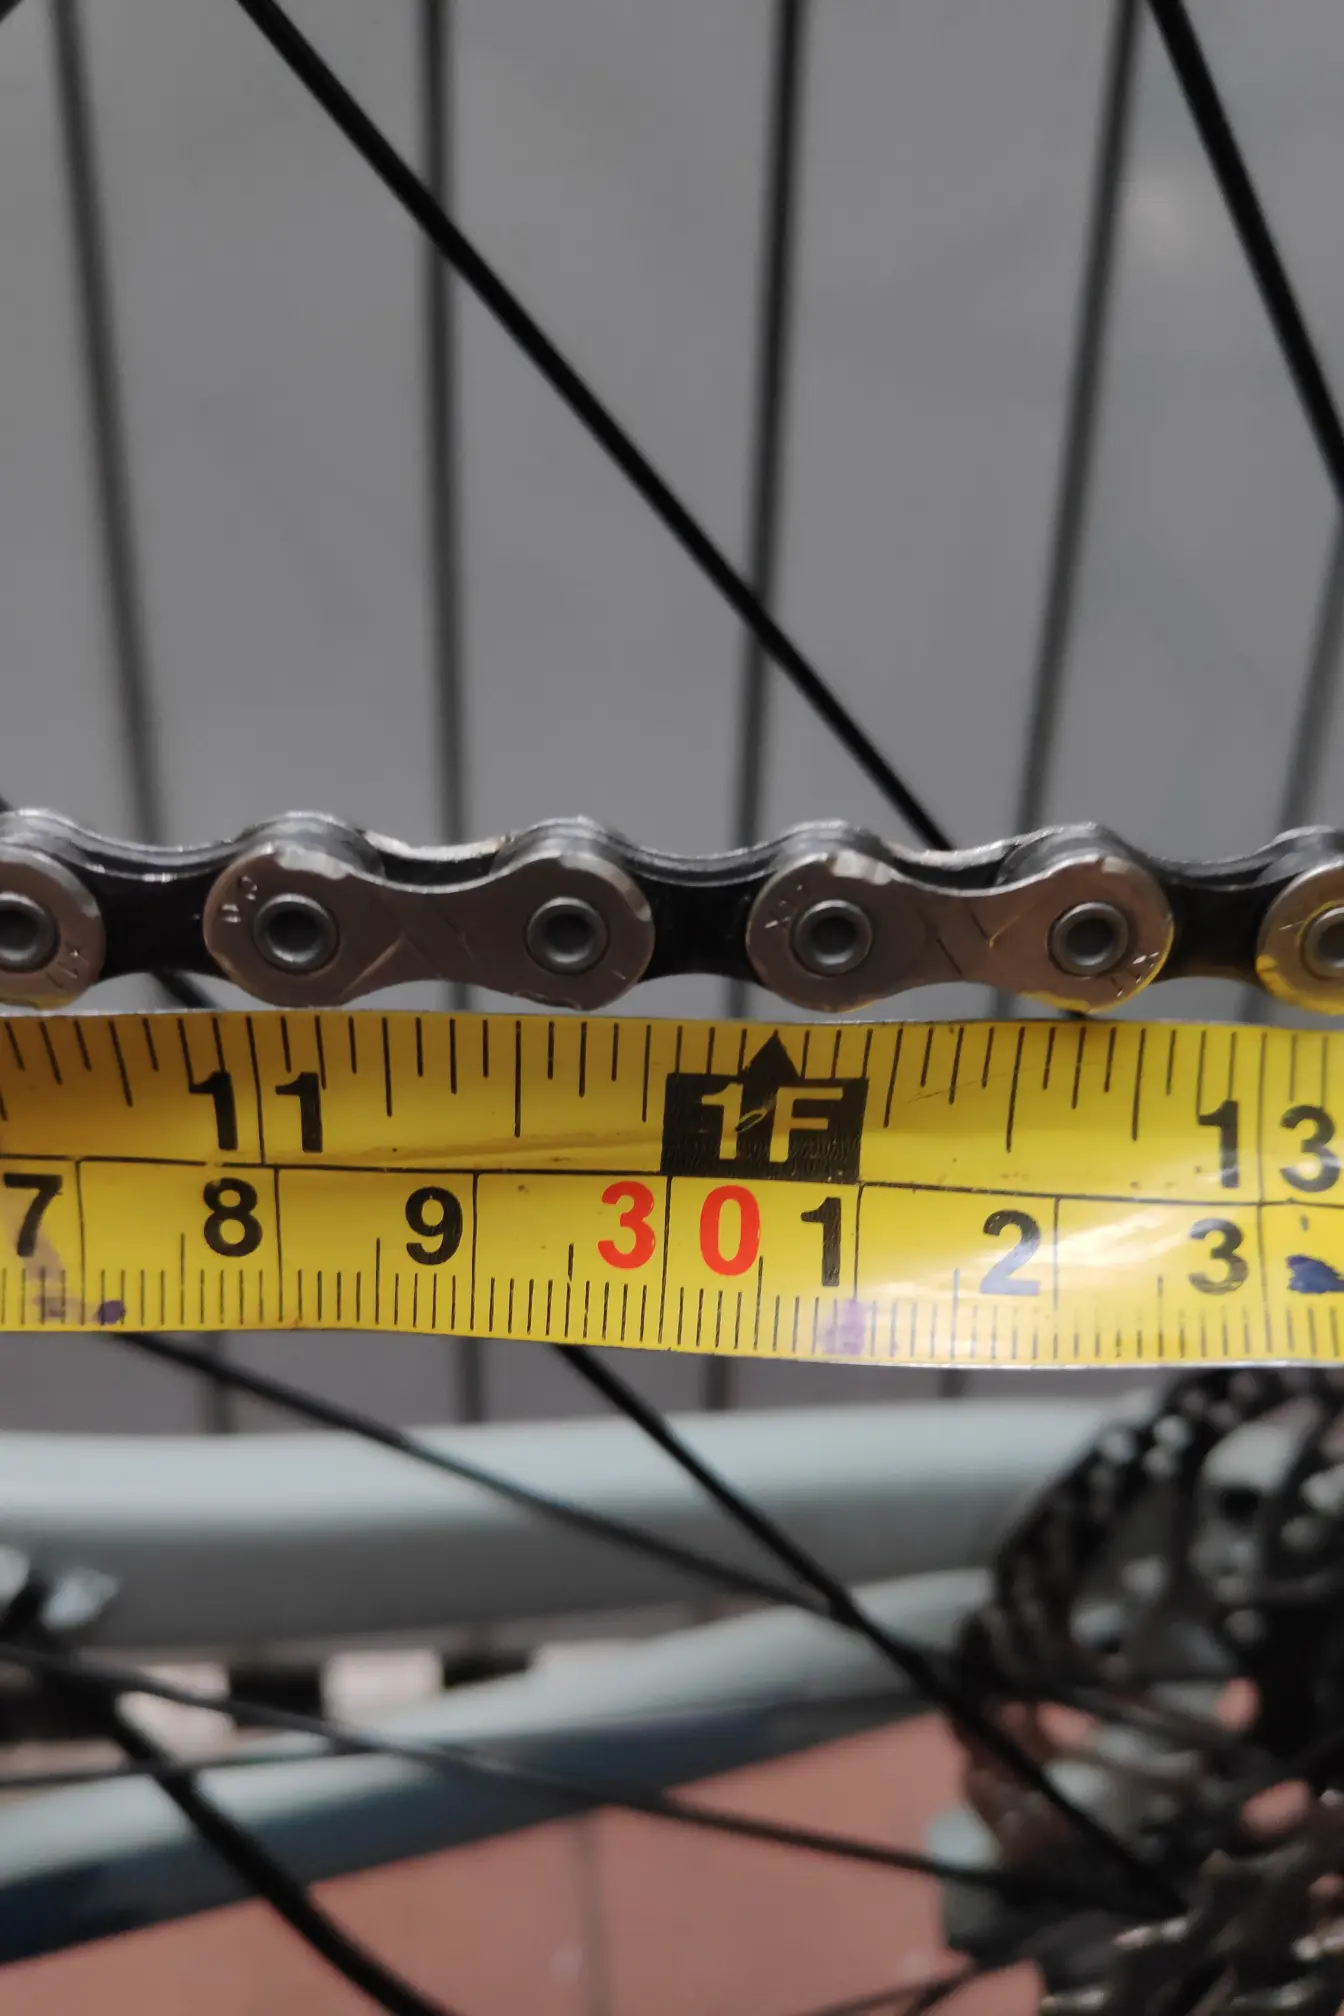
Step 2: Measuring Chain Stretch with a Ruler
Measuring chain stretch with a ruler is a straightforward and effective way to determine if your mountain bike chain needs replacing.
If the 12-inch mark on your ruler aligns with a chain link pin, the chain is still usable.
Double-check your measurement. If the 12-inch mark on your ruler does not align with a chain link pin, the chain is too worn and needs to be replaced.
Follow these detailed steps to perform this check accurately. Make sure you have a ruler or measuring tape with millimeter or inch markings.
Shift Gears to Release Tension:
Shift your bike to the smallest chainring in the front and the smallest cog in the rear. This reduces tension on the chain, making it easier to measure accurately.
Releasing tension ensures the chain is straight and taut for precise measurement, avoiding false readings caused by slack or bends in the chain.
Align the Ruler:
Place the chain on a flat surface. Position the ruler at the center of one chain pin (the rivet connecting the links). Ensure the zero mark on the ruler aligns exactly with the center of the pin.
Keep the ruler steady and ensure it is parallel to the chain. For greater accuracy, you can use a marker to mark the starting pin.
Measure the Stretch: Check 12-Inch Mark!
Look at the 12-inch (or 304.8 mm) mark on the ruler. The center of a pin should align with this mark on a new chain.
If the center of the pin is more than 1/16 inch (1.5875 mm) past the 12-inch mark, the chain is stretched and should be replaced. If it is more than 1/8 inch (3.175 mm) past, it’s definitely time for a new chain.
Intermediate Measurements:
For added precision, you can check the alignment at shorter intervals, such as 6 inches (152.4 mm). This can help identify uneven wear along the chain length.
Make sure to repeat the measurement at several points along the chain to ensure consistent wear. I thought my chain was good until I measured again and it was not. Uneven wear might indicate a localized issue or an improperly installed chain.
Document Your Findings:
Use a marker to note the measurement points if needed. This can help track wear over time if you conduct regular checks.
Keep a record of your measurements and the date. This helps monitor chain wear trends and predict when a replacement will be necessary. This is crucial for multiple bikes, allowing you to track usage and prioritize maintenance.
If the chain is stretched beyond the acceptable limit (typically 0.5% to 0.75% elongation), replace it to avoid damage to the cassette and chainrings.
Additional Tips:
Regular Checks: Perform this check every 500-1,000 miles or after rides in harsh conditions (muddy, wet environments) to catch wear early.
Proper Tools: While a ruler is a free and effective method, investing in a chain wear indicator tool can provide quicker and more precise measurements like in the next step.
Step 3: Using a Chain Wear Indicator Tool
Using a chain wear indicator tool is a quick and precise way to check for chain wear. This tool is specifically designed to measure the amount of elongation in your chain, helping you determine when it’s time for a replacement.
Acquire a Chain Wear Indicator Tool:
There are various brands and types of chain wear indicator tools, such as the Park Tool CC-3.2, Shimano TL-CN42, or Pedro’s Chain Checker. They typically measure wear at 0.5% and 0.75% elongation.
The Park Tool CC-3.2 is my trusted tool for accurately checking chain wear
Position the Tool on the Chain:
Shift your bike to the smallest chainring in the front and the smallest cog in the rear to reduce tension.
Insert one end of the tool into the chain. The tool usually has two prongs that fit into the links. Make sure the tool is correctly aligned and sits flush with the chain.
Measure the Chain Wear:
The chain wear indicator tool will have two sides, often labeled 0.5% and 0.75%. Insert the 0.5% side first.
0.5% Wear: If the 0.5% side drops completely into the chain, it indicates that the chain is moderately worn. Advisable to replace the chain if you have 11 or more rear gears. While it might still be usable if you have 10 rear gears or lower, you should prepare for a replacement soon.
0.75% Wear: If the 0.75% side also drops in, the chain is significantly worn and should be replaced immediately to prevent damage to the cassette and chainrings.
Interpret the Results:
0.5% Wear: This level of wear suggests the chain is approaching the end of its usable life. It’s a good idea to replace the chain soon to maintain optimal performance and prevent excessive wear on the drivetrain specially if you have 11 or more rear gears.
0.75% Wear: At this level, the chain has elongated too much and will likely cause shifting issues and accelerate wear on the cassette and chainrings. Immediate replacement is recommended specially if your bike have 10 or fewer rear gears.
Document and Plan for Replacement:
Yes, it can be tedious, but it’s an essential task that you need to complete. Note the date and wear level measured. Keeping a maintenance log helps track how quickly your chain wears, which can be useful for future maintenance planning.
Plan to replace the chain as soon as it reaches or exceeds the 0.75% or 0.5% wear mark depending on the number of rear gears you have. Regular monitoring ensures you catch this in time, preventing more costly repairs.
Step 4: Monitoring Performance
Regularly monitoring the performance of your bike chain can help you catch issues early and ensure optimal bike function. Here’s how to do it:
Observe Shifting Quality
Check for Smooth Shifting:
Ride your bike and shift through all the gears, both front and rear. Pay close attention to how smoothly the chain moves from one gear to another.
Smooth, quick transitions between gears without hesitation or noise.
: If the chain hesitates, skips, or makes unusual noises during shifting, it might be a sign of wear or elongation.
Evaluate in Different Conditions:
Test shifting performance under different loads (e.g., pedaling harder or softer) and on various terrain (e.g., flat, uphill, downhill).
Consistent performance across conditions. A worn chain often shows more pronounced issues under load or on challenging terrain.
Sluggish or inconsistent shifting under load indicates that the chain might be elongated or the drivetrain components might be worn.
Listen for Noise
Identify Unusual Noises:
While riding, listen for any unusual noises coming from the drivetrain, such as clicking, grinding, or squeaking.
A well-lubricated, properly functioning chain should be relatively quiet.
Increased noise levels, especially under load, can indicate chain wear or the need for lubrication.
Conduct a Stationary Test:
Lift the bike on a stand and rotate the pedals while shifting through gears. Listen closely for any unusual sounds.
Smooth, quiet operation with minimal noise.
Persistent noise or grinding sounds during shifts suggest the chain might be worn and require replacement.
Track Mileage
Keeping your bike in top shape starts with tracking mileage. Log the distance you ride after each trip and regularly tally the total. Chains typically wear out between 2,000 and 3,000 miles, depending on terrain and how well you maintain them. This mileage tracking method, widely used by bike rental companies to extend drivetrain life, is a smart practice for anyone who wants their bike lasting longer.
By comparing your recorded mileage with recommended chain replacement intervals (which can vary based on riding style and conditions), you’ll know when to inspect your chain more frequently and ultimately replace it before it causes damage to other drivetrain components.
Common Mistakes in Checking When to Replace a Bike Chain:
Ignoring Signs of Wear: Beginners often overlook early signs of chain wear, leading to more significant damage to the drivetrain.
Incorrect Measurements: Measuring chain stretch inaccurately or using the wrong reference points can lead to incorrect assessments of chain wear.
Improper Lubrication: Applying too much or too little lubricant can both cause problems. Follow manufacturer recommendations for the best results.
Reinstalling the Old Chain: It’s a surprisingly common mistake to accidentally reinstall the old chain instead of the new one. Always double-check the chain before installation.
Not Checking All Links: Failing to inspect every link for stiffness or damage can result in poor performance and increased wear.
Master Mountain Bike Chain Maintenance
Regularly checking and maintaining your mountain bike chain is crucial for ensuring a smooth, efficient ride and prolonging the life of your drivetrain components. By following these steps, from simple visual inspections to using a chain wear indicator tool, you can accurately determine when it’s time to replace your chain.
Monitoring your chain’s performance through shifting quality, noise, and mileage tracking helps catch issues early and prevent costly repairs. Keeping a consistent maintenance routine ensures your bike remains in top condition and enhances your overall riding experience. Read our guide to cleaning your MTB chain to get you started.
Have you ever had any funny blunders while replacing or checking your bike chain for wear and tear? Did you ever replace your old chain meticulously, only to realize you installed the old chain back instead of the new one? Share your experiences, tips, and any mishaps in the comments below.
Your stories can help fellow riders avoid common pitfalls and keep their bikes in top shape!
Dirt Bert
Swapped a suit and tie for a helmet and goggles, Delbert's not your typical engineer. He found his zen on rocky trails, catching the mountain biking bug and never letting go. Now, he shares his trail wisdom (and maybe some epic wipeout stories) on dirtlifebike.com to help you conquer your first climb and shred with confidence!