Crashing is part of cycling as crying is part of love.
Johan Museeuw
- The Lion of Flanders
Crashing is part of cycling as crying is part of love.
Johan Museeuw
- The Lion of Flanders
Conquer the Mountain. Find Your Freedom.
Conquer the Mountain. Find Your Freedom.
Confidently navigating trails is a vital skill for mountain bikers, especially when venturing into unfamiliar areas. Knowing how to interpret trail signs and markers is key to staying on course, avoiding potential hazards, and maximizing your riding experience. In this blog post, we’ll break down the essential elements of trail navigation, helping you accurately read signs and markers so you can enjoy your ride with confidence.
This post is designed for beginner and intermediate mountain bikers who, like me, initially found trail signs confusing. No prior knowledge is required, making it an accessible guide for all riders eager to gain a better understanding of trail signs and markers.
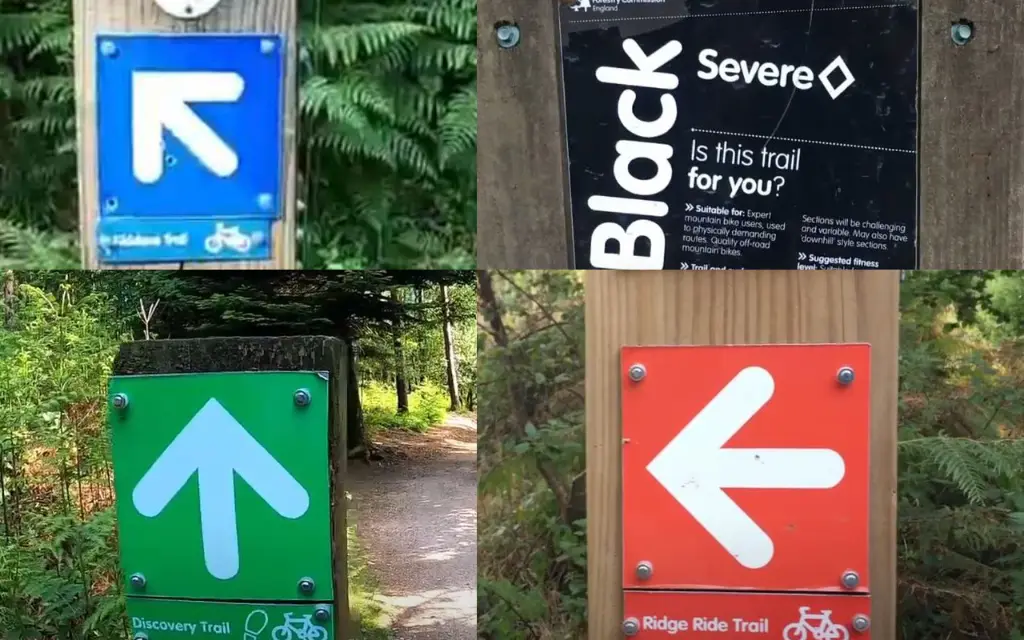
Trail markers are essential for navigating unfamiliar terrain, helping you understand the route and the difficulty of the features ahead. These markers guide you on which way to go and indicate the trail’s grade, giving you an idea of what to expect based on your skill level. As a beginner, it’s important to progress gradually through these grades, allowing you to build confidence and skill. These markers will also help you choose trails that align with your abilities and ensure you have the most enjoyable experience.
Green Trails: These are typically the easiest trails, often on wider paths like double track. Green trails usually lack significant downhill sections and challenging features, making them ideal for new or younger riders who are still getting used to mountain biking.
They offer a great introduction to the outdoors and allow you to learn the basics of mountain biking, such as braking, pedaling, and cornering. Green trails are perfect for helping beginners fall in love with the sport and are the least physically demanding, making them a great choice for introducing friends to mountain biking.
Blue Trails: Blue trails are generally single tracks with features specifically designed for mountain bikers. They provide an opportunity to explore more of what mountain biking has to offer, including flowing sections like berms and rollers, as well as manageable features such as drops and rocks.
These trails require a stronger fitness base and offer alternative routes, often referred to as “chicken trails,” for bypassing obstacles if you’re not ready to tackle them. While blue trails may seem challenging at first, they become easier with practice. They help riders progress, especially with features like drops and jumps, which, although limited in size (typically around a foot), are designed to be safe with rollable jumps and runouts.
Black Diamond Trails: Black diamond trails are designed for competent, expert riders who are accustomed to physically demanding routes. These trails are characterized by steeper and rougher terrain, often consisting of single tracks with technical sections.
You can expect a variety of surfaces and continuous challenges, making them more difficult than blue trails. Black diamond trails may include exposed open hill sections and large, unavoidable technical features that require advanced skills. Riders should have a high level of fitness and use appropriate protective gear.
Double Black Diamond (Expert/Pro): Reserved for the most elite riders, double black diamond trails represent the pinnacle of mountain biking difficulty. These trails feature extremely steep descents, massive drops, tight and technical sections, and other intense features that push the boundaries of what’s possible on two wheels.
Only those with exceptional bike handling skills, unwavering confidence, and peak physical fitness should attempt these trails. Double black diamond riders are the daredevils of the mountain, fearlessly defying gravity. Personally, I’d only attempt these trails if I had accident insurance and my will in place!
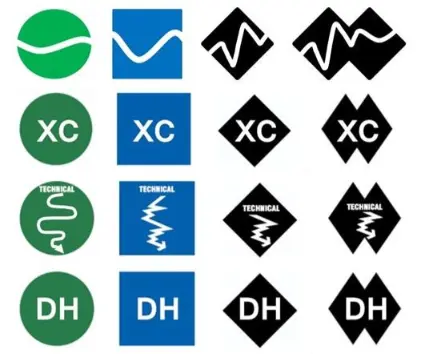
Freeride trails are generally wider than technical trails, offering more space for maneuvering and performing tricks. These trails often feature enhanced or modified terrain with constructed obstacles such as jumps, berms, banks, bridges, and drops, made from dirt, wood, or other materials. While freeride trails primarily focus on built features, they can also include natural elements found on technical trails, like rocks, roots, and other obstacles.
Freeride trails are typically designed to be ridden downhill, allowing riders to take full advantage of gravity for speed and excitement. These trails can be hand-built or machine-built, and their width and design make them visually distinct from technical trails.
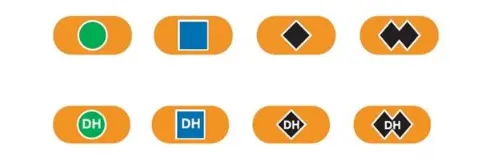
Freeride trails are marked with orange oval signs that include difficulty symbols to indicate the trail’s level of challenge:
These markers help riders choose trails that match their skill level, ensuring a fun and safe experience.
Mastering basic trail navigation is crucial for mountain bikers who want to enhance both their riding experience and safety. By understanding trail signs, markers, and maps, you can confidently navigate trails and fully enjoy every ride. Whether you’re a beginner setting out on your first mountain biking adventure or an experienced rider chasing the ultimate thrill, knowing the different grades of mountain bike trails is essential for a safe and rewarding experience.
Selecting trails that align with your skill level and comfort zone allows you to make the most of your time on the mountain while continuing to progress as a rider. Understanding the characteristics and markers of freeride trails, in particular, empowers you to make informed choices and maximize your enjoyment on the mountain. So, the next time you hit the trails, remember to choose wisely, ride responsibly, and embrace the exhilarating journey that mountain biking offers.
Want to delve deeper into mountain bike safety and trail signage? Check out the National Ski Areas Association (NSAA) for their comprehensive guide: https://nsaa.nsaa.org/NSAA/Safety/Mountain_Bike_Code_Trail_Signage
Share your trail navigation experiences and tips in the comments below! And don’t forget to check out our other MTB guides for more mountain biking techniques and insights to elevate your skills.


