Routing a mountain bike chain can seem tricky, but with this easy-to-follow guide, you’ll be back on the trails in no time. Follow these simple steps to ensure your chain is installed correctly
Materials Needed:
New bike chain or replacement chain
Chain tool or master link pliers
Chain lubricant
Bike stand (optional)
Step 1: Prepare Your Bike
Shift to the Smallest Gears:
Shift your bike to the smallest chainring (front) and the smallest cog (rear). This reduces tension on the chain and makes it easier to work with.
Remove the Old Chain:
Use a chain tool to push out a pin and break the old chain. If your chain has a master link, use master link pliers to disconnect it and carefully remove the old chain from the bike.
Step 2: Measure the New Chain
Lay the Chains Side by Side:
Lay the new chain next to the old one, ensuring both are straight and aligned.
Match the rivets of both chains to get the correct length.
Cut the New Chain:
Use the chain tool to remove any excess links from the new chain, ensuring it matches the length of the old one.
Put your old and new chain side by side before deciding to cut
Place the chain on the smallest chainring at the front. This reduces tension and makes routing easier.
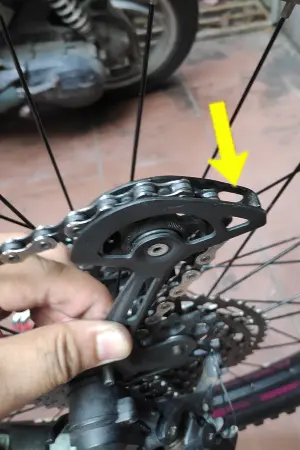
Make sure to get the chain inside the cage of the lower pulley wheel
Thread Through the Rear Derailleur:
Upper Pulley (Jockey Wheel): Begin by threading the chain over the top jockey wheel. This wheel is located closer to the derailleur’s mounting point on the frame.
Path: The chain should pass from the front chainring, over the top of the upper jockey wheel, and then move down towards the lower pulley
Route to the Lower Pulley (Tension Wheel):
Lower Pulley (Tension Wheel): After the chain goes over the upper jockey wheel, thread it around the bottom tension wheel. This wheel is usually positioned closer to the ground and is responsible for maintaining chain tension.
Path: The chain should come down from the upper jockey wheel, loop around the bottom of the lower pulley wheel, and then head back towards the rear cog.
Ensure Proper Alignment:
Make sure the chain is properly seated in the teeth of both the upper and lower pulleys. There should be no twists or misalignment, and the chain should flow smoothly through the derailleur cage.
Wrap Around the Cassette:
Wrap the chain around the smallest rear cog, ensuring it fits properly into the teeth.
Bring the Ends Together:
Pull both ends of the chain towards each other, bypassing the rear derailleur for now.
Step 4: Connect the Chain
Using a Master Link:
Insert half of the master link on each end of the chain.
Pull the chain ends together and snap the master link into place.
Using a Chain Pin:
Use the chain tool to press the pin through the connecting links, ensuring it’s properly aligned and secured.
Routing MTB Chains seemed easier upside down
Step 5: Test and Lubricate
Check for Proper Installation:
Rotate the pedals slowly and shift through all the gears. Ensure the chain moves smoothly and doesn’t skip or jump off the gears.
Lubricate the Chain:
Apply a bicycle-specific chain lubricant to each link while rotating the pedals backward.
Wipe off any excess lubricant with a clean rag.
Bonus Tips and Tricks
Double-Check Your Work: Always ensure the chain is properly routed through the derailleur pulleys and seated correctly on the chainrings and cogs.
Use Quality Tools: Investing in a good chain tool and master link pliers can make the process easier and more precise.
Regular Maintenance: Clean and lubricate your chain regularly to prolong its life and ensure smooth operation.
Chain Orientation: Some chains are directional. Check the manufacturer’s instructions to ensure the chain is installed the right way.
Check Tension: Proper tension is key. If the chain is too tight or too loose, adjust accordingly by moving the rear wheel or using the derailleur’s tension adjustment screws.
Common Mistakes to Avoid
Incorrect Path: Ensure the chain follows the correct path through the jockey and tension wheels. Misrouting can cause shifting problems and excessive wear.
Skipping Lubrication: Always lubricate the chain after installation to reduce friction and prevent rust.
Overlooking Chain Length: Double-check the chain length before cutting to avoid issues with tension and derailleur function.
Ensure Smooth Rides with Proper Chain Routing on Your Mountain Bike
Properly routing your mountain bike chain is essential for ensuring smooth shifting and optimal performance on the trails. By following this step-by-step guide, you can confidently install your chain, maintain its longevity, and enhance your biking experience.
Remember, regular maintenance and using the right tools can make a significant difference in your bike’s performance. Check out our how to clean mountain bike chain.
Have you encountered any challenges while routing your bike chain? Did you ever finish installing a new chain only to realize you cut it too short? Share your experiences and tips in the comments below.
Whether you’re a beginner or a seasoned rider, your insights can help others avoid common pitfalls and keep their bikes running smoothly. Let’s learn from each other and make every ride better!
Dirt Bert
Swapped a suit and tie for a helmet and goggles, Delbert's not your typical engineer. He found his zen on rocky trails, catching the mountain biking bug and never letting go. Now, he shares his trail wisdom (and maybe some epic wipeout stories) on dirtlifebike.com to help you conquer your first climb and shred with confidence!