Crashing is part of cycling as crying is part of love.
Johan Museeuw
- The Lion of Flanders
Crashing is part of cycling as crying is part of love.
Johan Museeuw
- The Lion of Flanders
Conquer the Mountain. Find Your Freedom.
Conquer the Mountain. Find Your Freedom.

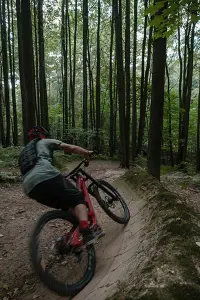
Heart pounding, I crested the hill. Below, the trail split. A smooth berm beckoned left, while a menacing double drop loomed right. Taking a deep breath, I dismounted, picked up my bike and walked down while thinking:
Line it Up: Aim for the apex (innermost point) to maximize berm support.
Speed Control is Key: Brake gently before entering, then ease off for a smooth transition.
Body Position for Stability: Stay centered, knees bent, outside foot down, lean in slightly with eyes focused through the turn.
Imagine carving through downhill switchbacks with effortless flow, leaving hesitant turns in the dust. This dream becomes reality by mastering the art of “lining.” It’s not about brute pedaling power; downhill mastery lies in conquering corners with precision using body position and bike control.
Ever feel like you’re wrestling your bike down a rough trail? Mastering the body & bike connection is the key to conquering descents with confidence and control. This connection hinges on two crucial elements: body positioning and leaning.
Downhill trails throw a variety of corners your way. Here’s where “lining” comes in:
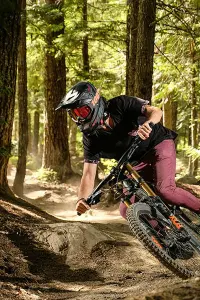
Embrace the Thrill of Banked Berms: Banked berms aren’t just sloped corners; they’re your gateway to carving smooth lines and unlocking a flowy riding experience. While leaning into them at speed might seem intimidating at first, mastering them is incredibly rewarding. These berms will have you grinning from ear to ear as you pump through them with confidence and control.
Mastering Unbermed Curves: Unbermed curves might seem like nature’s obstacle course, but with a bit of practice, they’ll transform into testaments to your riding prowess. These natural turns demand finesse, putting your braking, weight distribution, and body positioning skills to the test. Mastering them brings an unmatched sense of accomplishment, leaving you craving the next unbermed challenge.

Carve switchbacks with flow! The attack position lowers your center of gravity for stability, absorbing bumps. Bend knees and elbows like shock absorbers. Engage your core for a stable platform, improving handling and agility. Practice this on flat terrain before hitting descents. Feeling comfortable is key!
Bend Your Knees and Elbows: Think of your knees and elbows as shock absorbers. By bending them slightly, you create a suspension system that absorbs bumps and uneven terrain, reducing fatigue and keeping you in control throughout your descent.
Engage Your Core: Imagine your core as a natural corset, pulling your spine into alignment and creating a solid platform for maneuvering your bike. This core strength allows you to react quickly and precisely to the trail, improving your handling and agility.

Benefits of the Attack Position:
Enhanced Stability: Lowering your center of gravity makes your bike feel glued to the trail, reducing the risk of tipping over on rough sections.
Improved Handling: A lower center of gravity combined with a strong core allows for more precise control over your bike, making it easier to navigate tight corners and technical features.
Shock Absorption: Bent knees and elbows act as natural shock absorbers, reducing fatigue and keeping you comfortable on long descents.
Before tackling steep slopes, practice the attack position on flat terrain. This will help build muscle memory and confidence for conquering those downhill challenges. Remember, feeling comfortable and in control is the key to a smooth and enjoyable ride!
Weight distribution is an art. Learn how to shift your weight between the front and rear wheels for optimal traction on different sections of the trail:
Steeper Sections: Lower your stance by bending your knees further for maximum control.
Rolling Sections: Relax your stance slightly for a smoother ride and better absorption of smaller bumps.
Cornering? Leaning, not just handlebars! We’ll explore safe leaning techniques later. Here’s a preview: find the balance between not enough (grip loss) and too much (washout). Look through the corner, not down. Counter-steering (it’s not a typo!) helps initiate turns.
Finding the Sweet Spot: Discover the balance between leaning too far (washing out) and not enough (losing grip).
Eye Placement: Look through the corner, not down at your tire. This helps you maintain a smooth line and spot obstacles ahead.
Counter-Steering: It might sound counterintuitive, but it’s key to initiating turns effectively. We’ll explore how to use subtle steering inputs to guide your bike.
Mastering the art of leaning is crucial for navigating corners with confidence and control on downhills. But before hitting those slopes, it’s essential to hone your skills on flat terrain. Here’s how to practice safe leaning techniques:
Start Slow and Steady: Find a spacious, flat area free from obstacles or traffic. Begin by riding at a slow, comfortable pace.
Focus on Body Positioning: Adopt a good attack position with bent knees and elbows, and a strong core engagement. This lowers your center of gravity and provides a stable base for leaning.
Introduce Gradual Leans: Pick a landmark ahead and practice leaning your bike slightly towards it. Start with small leans and gradually increase the angle as you get comfortable. Remember, the goal is to feel balanced and in control, not to get the bike as horizontal as possible.
Look Through the Corner, Not Down: It’s tempting to look down at your front tire, but resist the urge! Train yourself to focus on where you want to go, looking through the corner at your chosen landmark. This helps maintain a smooth line and avoid surprises.
Feather the Brake: If you feel off-balance or need to adjust your line, apply light pressure on the brakes to slow down slightly. Avoid slamming on the brakes, which can cause you to lose control.
Practice Makes Perfect: Repeat these exercises, gradually increasing your speed and lean angles as you gain confidence. The more you practice, the more comfortable and instinctive leaning will become.

Safety Tips:
Wear a properly fitted helmet and other protective gear.
Choose a smooth, even surface free from gravel or loose debris.
Have a friend spot you for added safety, especially when starting out.
Don’t push yourself beyond your comfort zone. Progress gradually and focus on proper technique.
Now that you’ve mastered the attack position and weight distribution, let’s shred those sweet banked turns – berms! Here’s the key to maximizing your berm experience: it’s all about finding the perfect harmony between line selection, speed control, and maintaining proper body position.
The first step to conquering a berm is picking the right line. Aim for the apex, the closest point to the inside of the turn. This line maximizes the berm’s support and helps you maintain traction throughout the corner.
Before entering the berm, adjust your speed to avoid excessive braking mid-turn. Apply brakes gradually beforehand, then release as you enter for a smooth transition. Remember, maintaining momentum is key!
While the attack position is your foundation, here’s how to adjust it slightly for berms:
Maintain an athletic stance: Keep your knees and elbows slightly bent for control and shock absorption.
Center your weight: Balance evenly over both wheels, with your eyes focused on the exit of the corner.
Outside foot down: Place your outside foot down (opposite the turn direction) for added stability as you apply pressure on the pedals.
Lean into the turn: Shift your weight slightly inwards, keeping your head up and eyes looking through the corner for a smooth ride.
Once you enter the berm, leverage two key techniques:
Pump: Compress your body as you enter, then extend as you exit, using the berm’s support to generate speed.
Carve: Lean the bike into the turn while keeping your body aligned. This utilizes the bike’s grip to maintain control.
Finally, once you’ve passed the apex, focus on smoothly accelerating to carry the momentum you gained through the berm. Maintain a steady cadence and push through the pedals to propel yourself forward.
Finally, once you’ve passed the apex, focus on smoothly accelerating to carry the momentum you gained through the berm. Maintain a steady cadence and push through the pedals to propel yourself forward.
Theory is only half the battle! Let’s put those body positioning and leaning concepts into action with drills you can practice on mellow terrain. Before conquering technical descents, build confidence and muscle memory on these smooth trails.
Slow and Steady Wins the Race:
Master the basics first. Start with slow, controlled corners, focusing on proper body position and smooth weight distribution. As you gain comfort, gradually increase speed and lean angle.
Muscle Memory: Repetition is Key
The key to confident cornering is muscle memory. Repetition is your friend! Practice these drills consistently to develop natural instincts for handling turns on the trail.
Find Your Safe Haven: Practice Flat Ground
Safety first! Choose a flat, open area free of obstacles to practice your drills. This allows you to focus on technique without the worry of unexpected hazards.
No more tentative turns! With these berm-shredding techniques and practice drills, you’ll be carving downhill switchbacks with confidence and flow in no time. Get ready to transform from a “corner hugger” into a downhill master!
Stay tuned for upcoming sections where we’ll explore essential braking techniques and the importance of mental focus for conquering downhills like a true champion!
Keep exploring! Dive deeper with related posts. HERE


